A beautiful story alone does not make a children’s book ready for sale. How to print a children’s book to sell starts with choosing a publishing route and matching the format, layout and illustrations to your readers. Self-publishing gives you more control over these decisions, while a traditional publisher generally makes the printing choices.
You may already have a story, illustrations or a clear idea of who you want to reach. The next step is to bring them together in a book suited to its age group and ready for readers. Consider the reader’s age, how text and images work together on each page, and whether a print run or print-on-demand better fits your sales plans.
This guide explains how those choices shape a children’s book prepared for sale in South Africa. You’ll learn how to choose an age group, organise your manuscript and illustrations, prepare a print-ready layout and compare printing routes. With the key decisions settled, you can move from an idea to a book ready for its audience.
Key Takeaways
- Choose a publishing and printing route that fits how you plan to produce, store and sell your book.
- Match the story’s length, language and visual approach to the age group you want to reach.
- Plan page size and layout around the way text and illustrations work together.
- Prepare print-ready files with the finished book’s format and production requirements in mind.
- Learn what to weigh when deciding between a local print run and print-on-demand.
Printing choices for self-published and assisted self-published books
With self-publishing, you arrange production and take responsibility for selling the finished book. Assisted self-publishing adds professional support with tasks such as editing, design or print preparation, while you retain control. Either way, decide how many copies to produce, how readers will buy them and where you’ll store unsold stock.
There are two practical print routes. With a print run, you pay for a batch upfront and store copies until they sell. With print-on-demand, each book is produced when an order arrives, so you don’t need to hold unsold stock. A print run gives you copies ready for events or retailers; print-on-demand avoids planning around a large batch.
Imagine a custom picture book about South African wildlife. A small initial print run could supply a school event and local bookshops, while print-on-demand could fulfil individual online orders. You could also combine the approaches, using a batch for planned sales and on-demand printing for later orders. Choose based on expected demand, storage space and how soon you need copies.
Plan your sales route before choosing a printing method. A website can present the book directly to families, while bookstores and other retailers put it in front of browsing customers. Retail sales may involve different order quantities and delivery arrangements from individual online purchases. Make a simple channel plan: identify where people can order, who fulfils each order and how copies reach buyers.
Marketing is part of self-publishing, not a task that ends when printing is complete. Prepare a clear description, sample pages and cover artwork to introduce the book. For instance, promote a picture book about local birds through school communities, reading events or social posts featuring an illustration. Choose materials that make the subject and intended audience clear.
Plan shipping separately. Decide how books will be packed, where orders will be dispatched and how you’ll communicate about delivery. For bookstore or retailer orders, coordinate the number of copies and delivery arrangements for each channel. For direct sales, keep order details organised and pack books to protect their covers and pages.
Remember the publishing details. ISBN means International Standard Book Number, and self-publishing authors can obtain their own ISBNs and barcodes. Keep the title, author name and edition information consistent across the cover, sales listings and order records. This makes the book easier to identify as it moves through your sales channels.
Formatting the manuscript and illustrations
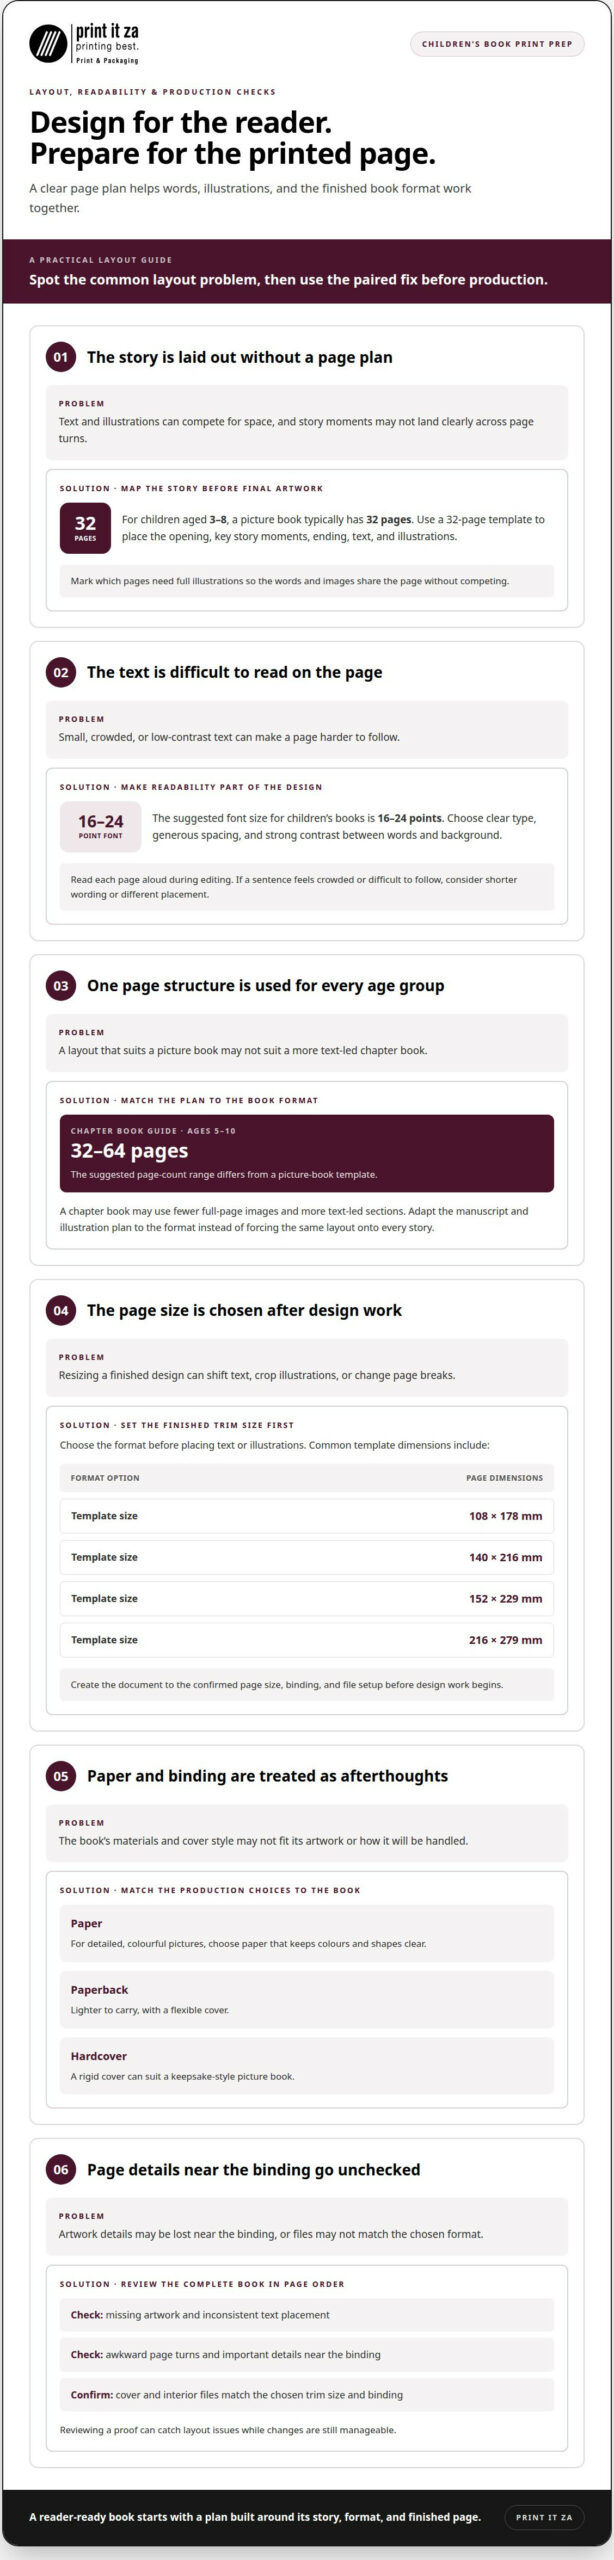
Set the manuscript up for the reading experience, not just the screen. A picture book needs room for artwork, readable text and clear page turns. For children aged 3-8, a typical book has 32 pages. A 32-page picture-book template can help you map the story, including where each illustration and line of text belongs.
Build a page plan before finalising the artwork. Mark the opening, key story moments and ending, then decide which pages need full illustrations. A story about a lost puppy, for example, might use one spread to show the search and another to reveal the reunion. Planning helps text and images share the page without competing for attention.
Keep text legible and consistent. A suggested font size for children’s books is 16-24 points. Use clear type, generous spacing and strong contrast between the words and background. Read each page aloud during editing; a sentence that feels crowded or difficult to follow may need shorter wording or a different placement.
Choose paper and binding to suit the artwork and how the book will be handled. For detailed, colourful pictures, select paper that keeps colours and shapes clear. A paperback is lighter to carry and has a flexible cover. A hardcover’s rigid cover can suit a keepsake-style picture book. In either format, check how the cover, interior pages and illustrations work together.
Print-on-demand produces physical copies as orders arrive, while an ebook gives readers a digital format. You can offer both, but prepare each for its intended use. A printed page has fixed dimensions and page turns; a digital edition may display differently across screens. Keep the story, title and illustration sequence consistent so readers recognise the same book in each format.
For a chapter book aimed at ages 5-10, the suggested page-count range is 32-64 pages. That differs from a picture-book template, so adapt the manuscript and illustration plan to the format. A chapter book may use fewer full-page images and more text-led sections. Don’t force the same layout onto every age group or story.
Before production, review the complete book in page order. Check for missing artwork, inconsistent text placement, awkward page turns and illustrations that lose important details near the binding. Confirm that the cover and interior files match the chosen trim size and binding. Reviewing a proof can catch layout issues while changes are still manageable.
Book layout and print-ready files
Build the page layout around the finished book’s trim size, not a blank document’s default settings. Common template dimensions include 108 × 178 mm, 140 × 216 mm, 152 × 229 mm and 216 × 279 mm. These convert the listed 4.25 × 7, 5.5 × 8.5, 6 × 9 and 8.5 × 11 inch formats. A picture book may need a wider page for artwork, while a text-led story may suit a narrower shape.
Choose the format before placing text or illustrations. Printing requirements can affect the layout, so confirm the finished page size, binding and file setup before design work begins. Create the document to those specifications rather than resizing a finished design at the end. Resizing can shift text, crop illustrations or change page breaks.
Keep text and artwork within the intended page area. Leave enough room around words and important picture details, particularly near the binding edge. A character’s face placed too close to the edge, for example, may look crowded once the book is assembled. Consistent text placement also helps children follow each spread.
Treat the interior and cover as separate parts of the project. The interior file contains the story pages in reading order. The cover design brings the front, back and spine together as one finished piece. Spine width depends on the final book specifications, so settle the page count and production details before setting it.
Before exporting, review the layout from the opening page to the end. Check that the page order makes sense, text has not overflowed and illustrations appear at the intended scale. Inspect full-page artwork and any words placed over an image. A careful proof can catch a missing page number or accidental blank page before production.
Use clear file names to distinguish versions, such as “Story-interior-final” and “Cover-final”. Keep editable working files separate from exported print files. When you revise the design, update both versions and review the new export rather than relying on an older proof. This helps prevent mismatched cover and interior artwork.
Finally, open each exported file and inspect it page by page. Confirm that the trim size is intact and every page appears in sequence. For a picture book, check that illustrations and text align across each spread. Reviewing the final files against the printer’s specifications helps keep the approved layout consistent with the chosen format.
Choosing the target age group
Choose your intended reader before setting the story’s vocabulary, length or illustration style. Age offers a starting point, but reading confidence and interests also shape what feels engaging. A story for toddlers, for example, needs a different pace and page experience from a chapter book for older primary-school readers.
Use these age bands as practical guides when shaping the manuscript:
- Ages 0-3: Babies and toddlers often respond to familiar words, repetition and clear pictures.
- Ages 4-6: Pre-K through first grade readers suit short stories, simple sentences and strong visual storytelling. One suggested maximum is 1,000 words.
- Ages 7-9: Second through fourth grade readers may be ready for more plot and chapter-book structure. Suggested lengths include 2,500 words for books aimed at ages 5-9, and 10,000-12,000 words for chapter books aimed at ages 7-9.
- Ages 10-12: Fifth through seventh grade readers can follow more developed stories. Short or middle-grade novels for this group are suggested at 20,000-25,000 words.
These ranges overlap because a child’s age band doesn’t dictate one reading level. A 5-9 book at 2,500 words and a chapter book for ages 7-9 at 10,000-12,000 words serve different reading experiences. Decide whether your book is meant for shared reading, independent practice or longer immersion, then shape the text around that purpose.
Consider the adult who may read alongside the child, too. For an ages 0-3 picture book, repeated phrases can make read-aloud moments easy to follow. For ages 7-9, a story about a school mystery can build across chapters, with enough context to help readers return to the plot after a pause.
Match illustrations and page design to the reader’s experience. Younger children benefit from pictures that carry part of the story, while older readers may follow longer passages between images. In Adobe InDesign, a designer can arrange text and artwork across a planned sequence of pages. The software doesn’t choose the audience; the story’s needs should guide the layout.
Test the age fit by reading a sample aloud and asking a child in the intended group to follow it. Notice where they pause, lose interest or ask for an explanation. If a 6-year-old struggles with a sentence, simplify the wording or add context. If a 10-year-old finds a scene too predictable, give the character a more challenging problem.
Describe the intended age group consistently in your cover copy and sales information. A clear label helps parents, teachers and gift buyers understand who the story is for. Align the description with the book’s vocabulary, themes and reading experience, rather than choosing an age band just to broaden its apparent audience.
How do local printers compare with print-on-demand for quality, cost, and minimum order?
For authors deciding how to print a children’s book to sell, the right choice depends on production needs and sales plans. Print-on-demand produces a copy when an order arrives, while a local print run produces a planned batch. Print-on-demand can start without a minimum order. A batch may suit authors who need copies together for events, school visits or retailer orders.
Neither option automatically guarantees better quality. The result depends on paper, binding, colour reproduction, file preparation and production checks. A full-colour picture book needs clear detail and consistent colour throughout. Compare a physical proof with the approved artwork before proceeding with a larger batch.
Assess each route using the same book specifications. Keep the trim size, page count, cover finish and interior artwork consistent. Then review a sample for:
- Colour and detail in illustrations, including darker areas.
- Text clarity and alignment near page edges and the binding.
- Cover feel, page handling and how the book opens.
- Consistency between copies of the same title.
For cost planning, compare the full production and fulfilment process, not just printing. A batch means committing to copies before individual sales happen; with print-on-demand, copies are produced as orders arrive. Include storage, packing, shipping and retailer arrangements in your calculations. Your choice about how to print a children’s book to sell should reflect expected demand and how you’ll manage fulfilment.
Minimum order needs also differ. Print-on-demand avoids ordering a batch in advance. A local print job may be planned around a set quantity, which affects how many copies you can hold for direct sales, school events or bookshops. One reported printer order had a minimum of 1,000 books, but that example isn’t a universal minimum. The relevant quantity depends on the specific print arrangement.
Consider quality control and logistics together. A local print run gives you a group of copies to inspect and distribute at once. With print-on-demand, production happens across individual orders, so review a sample before relying on that format. For a South African author selling through several channels, delivery destinations and stock handling also shape the practical choice.
A blended plan can work when sales situations call for different quantities. You could print a batch for a planned school visit, then use print-on-demand for later individual orders. This ties the batch to a known event while leaving another production route available. Choose based on how readers will find the book, when copies are needed and how much stock you can manage.
Print It ZA print and packaging: Book printers
Print It ZA prints books in-house, helping authors turn a prepared children’s manuscript into a finished book for readers. Its book-printing service suits authors who have settled their story, audience and preferred format and are ready for production.
Whether you’re developing a personalised children’s book or preparing a title for sale, clear decisions about the cover, pages and artwork help shape the final result. Print It ZA print and packaging also produces books and catalogues, supporting projects with different content and presentation needs.
Have your manuscript and artwork ready to discuss the book’s intended format and production requirements. For help with your book project, contact Print It ZA print and packaging.
Take your story from plan to printed book
Your next step is to turn creative decisions into a production brief. Bring together the manuscript, finished illustrations and cover concept, then describe the reading experience you want to create. A clear brief connects the story’s purpose with the physical book you’re preparing for its audience.
Planning how to print a children’s book to sell means thinking beyond the first copy. Consider how the finished title will sit alongside your author identity and the materials you use to introduce it to readers. Print It ZA prints books, catalogues and brochures, so your book project can sit within a wider range of printed materials.
If your manuscript is ready to move towards production, contact Print It ZA print and packaging to discuss the book project. Your story is ready for its next chapter, and a considered print plan can help you take that step with confidence.
Frequently Asked Questions
How do I prepare a children’s book manuscript and illustrations for printing?
Finish the text and artwork before assembling the final production files. Keep a master copy of the manuscript, then match each illustration to its intended scene and page. If a character changes clothes during the story, for example, check that detail across every relevant image. Use artwork you created or have permission to reproduce. Review the cover and interior together so the title, author name and visual style remain consistent.
What are the standard children’s book sizes and page counts?
Common children’s book dimensions include 203 × 254 mm for portrait and 254 × 203 mm for landscape. A 32-page count is typical for books aimed at ages 3-8, while ages 5-10 may suit 32-64 pages. These are useful reference points, not a single format for every story. A compact book for reading on the move may need a different shape from a picture book designed for wide illustrations.
What print-on-demand services print and sell children’s books in South Africa?
Print-on-demand services produce a copy after an order arrives, and some also provide sales or distribution tools. These functions are separate: printing a book doesn’t automatically place it in a shop or online marketplace. In South Africa, compare the production route with the sales channels you need. Print It ZA offers book printing; choose a print-on-demand arrangement only if its ordering and fulfilment model suits your plan.
How much does it cost to print children’s books in South Africa?
There isn’t one useful figure for every children’s book. The total depends on details such as page count, finished size, paper, colour, binding and quantity. Distribution and storage also affect the overall budget. For a meaningful comparison, use the same specifications for each production option, then factor in packing and delivery alongside printing. This gives you a clearer basis for setting a retail price without relying on an unrelated estimate.
What file formats, resolution, colour profiles, and bleed do children’s book printers require?
File requirements depend on the production workflow, so prepare files to the printer’s current specifications rather than assuming universal settings. Before exporting, confirm the accepted file format, image resolution, colour profile, bleed and trim area. Keep working files editable and export the print version separately. For artwork extending to the page edge, include the requested bleed and inspect the export at full size.
How do I get an ISBN and barcode for a children’s book in South Africa?
ISBN means International Standard Book Number, and a barcode lets the number be scanned in sales settings. Decide who will publish the book and keep its title, author and edition details consistent across the cover and sales records. Follow South Africa’s ISBN application process, then use the assigned details to prepare the barcode. Organise each distinct edition as a separate publishing record.
How do I price, distribute, and market a self-published children’s book in South Africa?
Set a retail price by accounting for production, packing, delivery and any retailer share, then compare the total with your intended sales channels. Direct orders and bookstore sales, for example, may have different fulfilment needs. Build a simple launch plan around your audience: prepare sample pages, a concise description and cover artwork for schools, reading events or online promotion. Track orders and stock separately to see which channels reach readers.
What copyright, illustration licensing, and publishing rules apply to children’s books in South Africa?
Authors are responsible for securing permission to use copied illustrations. Self-publishers can obtain their own ISBNs and barcodes; ISBN means International Standard Book Number.